Roofing Calculator
Estimate roof area, shingles, bundles, underlayment, waste allowance, and material needs from footprint, pitch, and roofing choices.
Interested in Advertising?
Tell us more, and we'll get back to you.
Contact UsEstimate roof area, shingles, bundles, underlayment, waste allowance, and material needs from footprint, pitch, and roofing choices.
Tell us more, and we'll get back to you.
Contact UsEstimate roof area, shingles, bundles, underlayment, waste allowance, and material needs from footprint, pitch, and roofing choices.
Share the current inputs or ask ChatGPT to explain the calculation in context.
Roofing calculations have evolved from simple geometric principles used by ancient builders to today's precise measurements that account for various pitch factors and material specifications. This systematic approach to roofing measurement, developed through centuries of architectural practice, ensures accurate material estimation and efficient installation processes.
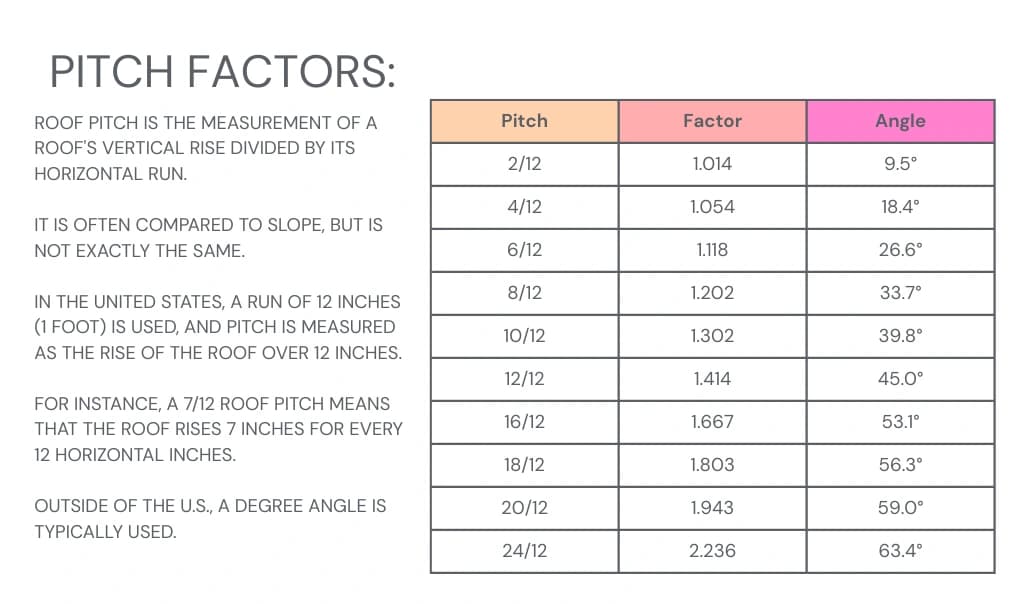
| Pitch | Factor | Angle |
|---|---|---|
| 2/12 | 1.014 | 9.5° |
| 4/12 | 1.054 | 18.4° |
| 6/12 | 1.118 | 26.6° |
| 8/12 | 1.202 | 33.7° |
| 10/12 | 1.302 | 39.8° |
| 12/12 | 1.414 | 45.0° |
| 16/12 | 1.667 | 53.1° |
| 18/12 | 1.803 | 56.3° |
| 20/12 | 1.943 | 59.0° |
| 24/12 | 2.236 | 63.4° |
Roof area starts with geometry, but ordering materials also depends on waste, roof shape, local practice, and the product being installed. A simple gable roof with few penetrations may be close to the calculated area plus a modest waste allowance. A roof with hips, valleys, dormers, skylights, chimneys, and several pitch changes needs more cut pieces and therefore more waste.
Pitch changes the surface area because a sloped roof is larger than the flat footprint below it. The pitch factor accounts for that slope. A low-slope roof has a factor close to 1. A steep roof has a larger factor and may also require different installation methods, safety equipment, underlayment, or fasteners. The calculator gives the area; the product instructions and local code tell you how the material must be installed.
Roofing materials are sold in different units. Asphalt shingles are commonly estimated by squares, where one square covers 100 square feet. Metal roofing may be ordered by panel length and width. Tile, slate, underlayment, ridge caps, starter strips, flashing, nails, vents, and drip edge each have their own coverage rules. Convert the roof area, then check the coverage printed by the manufacturer.
Do not forget tear-off and deck condition. Removing old roofing can reveal rotten sheathing, damaged flashing, poor ventilation, or framing problems. Those repairs may not change the roof area, but they change the budget and schedule. A realistic estimate includes disposal, underlayment, flashing, permits, safety setup, and a contingency for repairs that are not visible from the ground.
Climate affects material choice. Hot sunny areas may benefit from reflective shingles, metal, or tile. Cold climates need attention to ice dams, attic insulation, and ventilation. Wind-prone regions may require higher-rated shingles or fastening patterns. Wildfire zones may limit certain materials. The area calculation is the starting point, not the whole roof specification.
If you are measuring by hand, sketch each roof plane and label the dimensions. Keep hips, valleys, dormers, and porch roofs separate until the final total. Photos help when you review the estimate later. For a steep, high, or damaged roof, use a professional measurement or aerial report rather than climbing into an unsafe situation.
A practical way to use a roofing material estimate is to begin with the real decision, not with the blank form. Suppose you are turning roof measurements into a practical order for shingles, panels, underlayment, and accessories. Write the question in one sentence before entering numbers. That sentence keeps the work focused and makes it easier to decide which inputs matter and which details can be left out for a first pass.
Next, collect the inputs in their original form: roof planes, pitch, waste allowance, penetrations, valleys, material coverage, and local code needs. Do not clean them up too early. Rounding, changing units, or combining categories before you understand the source can hide the very detail that explains a surprising result. If one value comes from a bill, another from a website, and another from memory, mark that difference in your notes.
Choose one working unit system for the calculation. Mixed units are one of the easiest ways to get a believable but wrong answer. The relevant units here may include square feet, squares, pitch factor, bundles, panels, and waste percentage. Convert deliberately, label each value, and keep the original number nearby. If the result will be shared with someone else, include both the converted value and the starting value.
Run the first calculation as a baseline, then change one assumption at a time. A low case, expected case, and high case often tell you more than a single answer. If a small change in one input moves the result a lot, that input deserves more attention. If a change barely moves the result, do not spend too much time arguing over tiny precision.
Check the result against common sense. Ask whether the value is in the right order of magnitude, whether the sign or direction makes sense, and whether the answer would still be believable if you explained it to someone familiar with the subject. A calculator can process the inputs exactly as entered, but it cannot know that a decimal point was placed in the wrong spot or that a unit label was copied incorrectly.
Look for hidden constraints. Some quantities can scale smoothly, while others come in whole items, legal categories, standard sizes, rated parts, or policy limits. When the result points to a decision, compare it with those constraints before acting. The computed value may be the starting point for a quote, design, budget, or study plan rather than the final number used in the field.
Keep a short record of the version you used. Save the date, source of the inputs, assumptions, and any manual adjustments. This habit is especially useful when you revisit the calculation later and wonder why the number changed. Often the math is the same, but the rate, price, sample, measurement, or target has been updated.
If the answer affects money, safety, code compliance, health, or a formal report, treat it as an estimate to review rather than a final authority. Use the result to prepare better questions for a contractor, teacher, advisor, inspector, coach, or specialist. Good calculations do not replace expert judgment; they make those conversations clearer.
Finally, reread the inputs after seeing the answer. People often notice mistakes only after the result feels too high, too low, or oddly exact. A quick second pass catches transposed digits, stale assumptions, and unit mismatches. That small review step is usually faster than fixing a bad decision made from a neat-looking number.
Before treating the roofing estimate as ready to use, ask where each input came from. A value copied from a field measurement, aerial report, contractor bid, or product coverage sheet may be accurate for one purpose and weak for another. Source quality matters. A measured value, a legal notice, a lab record, or a manufacturer table deserves more confidence than a rounded number remembered from a conversation.
Ask what the result will be used for. A rough planning estimate can tolerate more rounding than a purchase decision, safety review, permit application, lab report, or client quote. If the decision is expensive or hard to reverse, keep more digits in the working notes and round only when presenting the final answer.
Ask whether any practical limits sit outside the formula. For this topic, common limits include pitch, waste, roof complexity, and code or manufacturer requirements. The calculator handles the math visible on the page. It does not know every rule, market condition, product limit, or human factor that may affect the final decision.
Ask whether a second calculation would change your mind. Try a cautious case with less favorable assumptions, then an optimistic case if that is useful. When all cases point to the same decision, the conclusion is stronger. When the answer changes easily, the next step is to improve the uncertain input rather than polish the arithmetic.
Ask who should review the result. A friend can catch a typo, but a professional may be needed for contracts, health, taxes, engineering, code compliance, or large purchases. The best use of a calculator is to make that review more specific. You can show the inputs, the result, and the assumption that matters most instead of starting from a vague guess.
A final roofing check is to compare the calculated area with how the material is sold. Shingles, panels, underlayment, ridge caps, and flashing are not ordered from the same number in the same way. Area starts the estimate; product coverage turns it into a purchase list.
To calculate your roof area accurately, measure the length and width of each roof plane and multiply by the pitch factor (found in a pitch table). For a gable roof, multiply the result by 2. Consider valleys, dormers, and other features that might add to the total area. Always add 10-15% for waste and irregularities.
For hot climates, consider reflective materials like metal roofing or light-colored shingles. In cold regions, asphalt shingles with proper insulation work well. High wind areas benefit from metal or high-grade architectural shingles. Rainy climates need materials with good water resistance like slate or certain composites.
Building codes typically require 1 square foot of ventilation for every 150 square feet of attic floor space if you have a vapor barrier, or 1:300 without one. Proper ventilation should be balanced between ridge/roof vents and soffit vents. This helps prevent moisture buildup and extends roof life.
Underlayment provides a secondary water barrier and protects the roof deck. Synthetic underlayment offers better durability and water resistance than traditional felt paper. Rubberized underlayment is recommended for ice dam prone areas and valleys. The choice depends on climate, roof pitch, and primary roofing material.
Shingles and panels need trimming at edges, valleys, hips, ridges, and roof penetrations. A simple roof may need about 10% extra material, while a roof with many cuts or dormers may need 15% or more.
Yes. A steeper pitch has more surface area than the flat footprint of the building. The pitch factor converts the plan-view area into the sloped roof area used for material estimates.